Rebar fabrication services reduce field cutting, support accurate placement, and help concrete crews keep schedules, inspections, and deliveries on track.
How to Position Mesh Supports in Concrete
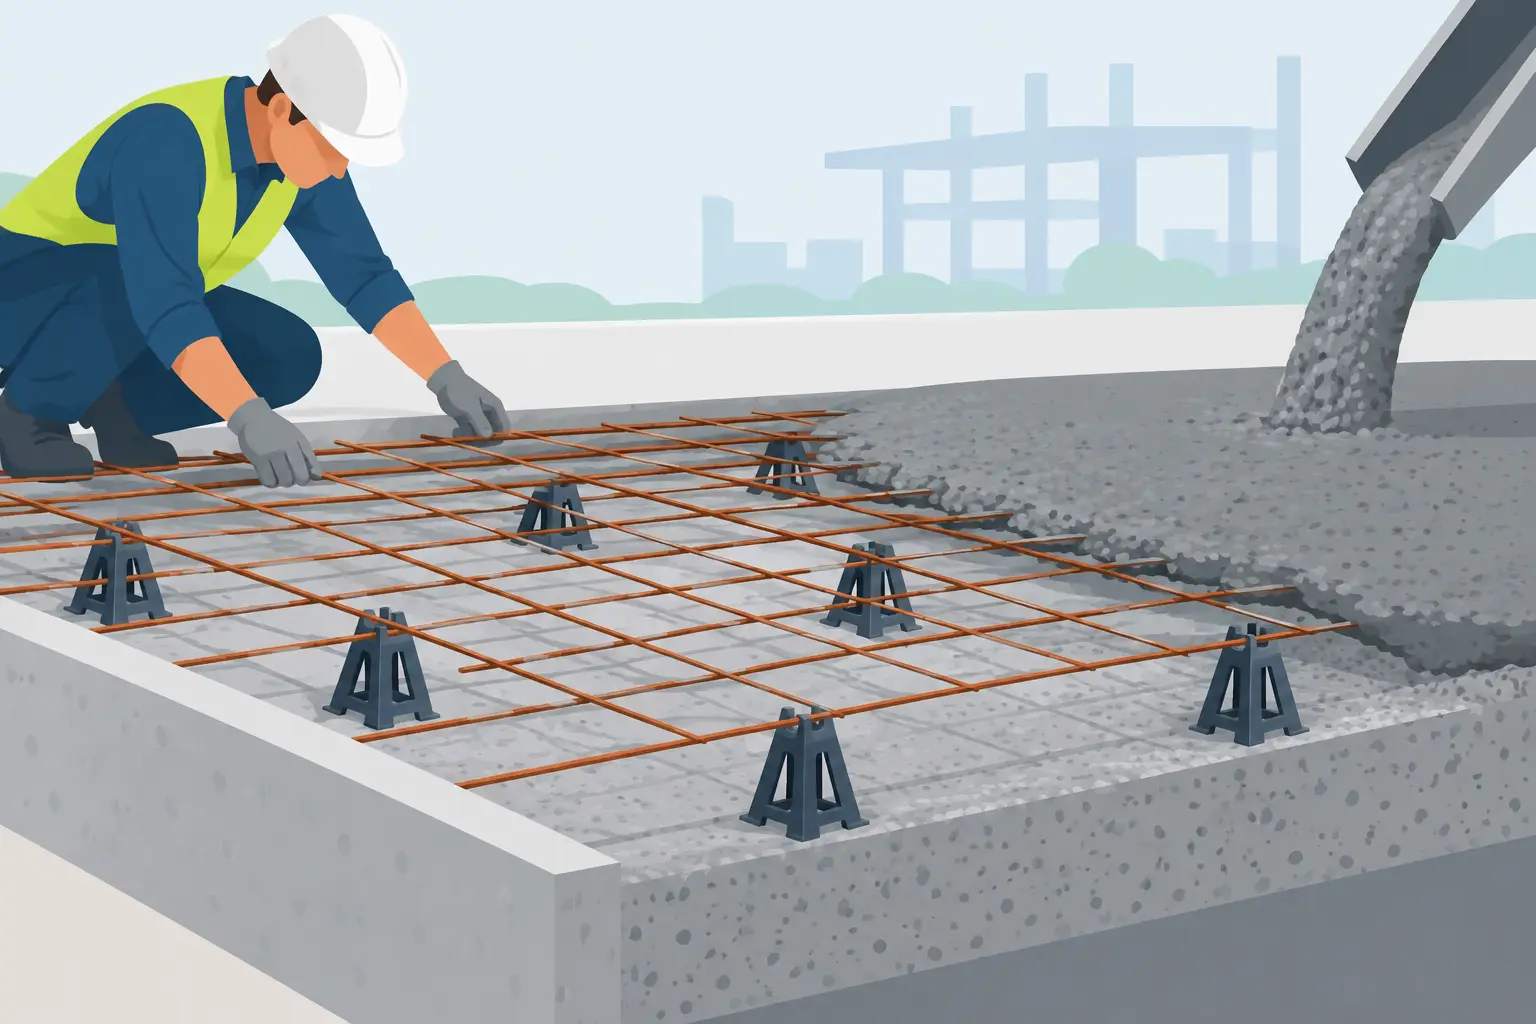
A reinforcing mesh sheet on the ground is not doing the job it was specified to do. Knowing how to position mesh supports keeps mesh at its designed level while concrete is placed, compacted, and finished. That matters on every slab, driveway, footing, and suspended element where the reinforcement needs to control cracking and contribute to the intended structural performance.
Mesh supports, commonly called bar chairs, are a small item with a major site impact. Set them too low and the mesh can end up buried near the bottom of the pour. Set them too high, use the wrong chair, or place them inconsistently and you can lose required concrete cover, create finishing problems, or leave sections of mesh unsupported. The right setup starts with the drawings and carries through to a final pre-pour inspection.
Start With the Reinforcement Details
There is no single chair height or spacing pattern that suits every slab. The engineer’s drawings, slab schedule, and project specifications set the required mesh grade, mesh location, cover, laps, additional bars, and support requirements. Follow those documents before relying on a standard site rule.
For a typical ground-bearing slab, mesh is often positioned in the upper portion of the slab rather than sitting in the middle or on the base course. That location helps it manage shrinkage cracking near the surface. But the required depth varies with the slab design, loading, exposure conditions, finish, and reinforcement layout. Suspended slabs, thicker concrete sections, and areas with top-and-bottom reinforcement need a different support arrangement.
Work out the support height from the specified reinforcement level, not from the overall slab thickness alone. Allow for the required concrete cover below the mesh, the diameter or thickness of the mesh, and the chair profile. If the plans are unclear, stop and confirm with the designer, engineer, or site supervisor. Guessing at reinforcement height is not a practical shortcut.
Prepare a Stable Base Before Setting Chairs
Mesh supports only work when they sit on a firm, even surface. Prepare, compact, and level the subbase to the specified standard before chairs and mesh arrive. On slabs with a vapor barrier, make sure the membrane is intact, properly lapped, and free of loose folds that could affect chair stability.
Do not use broken concrete, timber offcuts, bricks, stone, or random steel as improvised spacers. They can puncture the membrane, shift under foot traffic, create inconsistent cover, or leave unsuitable material within the concrete. Purpose-made plastic or steel bar chairs give a known height and are designed to support reinforcement without creating unnecessary problems during the pour.
Choose a chair type that suits the job. Plastic chairs are common for mesh on membrane and base course. Continuous runners can be useful where a broader bearing surface helps reduce chair marks or movement. Steel chairs may be specified for heavier reinforcement arrangements, but they need to be suitable for the exposure and cover requirements. The chair must support the steel without damaging the vapor barrier or becoming unstable on the prepared surface.
How to Position Mesh Supports Across the Slab
Set mesh supports in a regular grid so every sheet is held at the required elevation. Spread chairs evenly beneath the mesh rather than concentrating them only around sheet edges. The mesh should remain level and supported between chairs when workers walk nearby or when concrete is discharged.
Chair spacing depends on the mesh weight, sheet size, chair strength, access across the reinforcement, and the way concrete will be placed. Lighter residential mesh on a well-prepared base may need a different layout from heavy mesh in a commercial slab with frequent worker traffic and pump hose movement. Use the spacing shown in the project documents or the chair manufacturer’s load guidance. Add supports where site conditions show the mesh could sag.
As a practical check, look along the mesh before the pour. It should sit at a consistent height with no obvious low points. If a worker can easily push the mesh down to the base, the support layout is not adequate. Adding chairs before concrete arrives is quick. Trying to lift mesh after concrete has been placed is unreliable and usually too late.
Keep chairs beneath the main body of each sheet, including the center areas. Support sheet edges and lap areas as well, but do not create an over-supported edge with a sagging middle. Where sheets meet, place chairs so the overlap stays at the required level and does not separate or curl upward.
Support Laps, Cut Sheets, and High-Traffic Areas
Mesh laps need particular attention because two layers of steel create extra weight and can change the reinforcement level. Position supports beneath overlap zones so both sheets remain secure and the lap length stays as detailed. Tie the sheets where required using tie wire so they do not spread apart during placement.
Cut sheets and narrow infill strips can move more easily than full sheets. Support them at a spacing that prevents tipping and tie them into the main reinforcement. The same applies around penetrations, rebates, slab edges, service trenches, and column locations, where mesh may be cut and additional bars may be present.
Install extra chairs along planned access routes, pump hose paths, wheelbarrow routes, and around areas where the placing crew will work repeatedly. Concrete crews should avoid walking directly on mesh wherever possible, but a reinforcement layout needs to account for normal site activity. Unsupported mesh can be pushed down in minutes.
Maintain Concrete Cover at Edges and Around Services
Chair height controls the level below the mesh. Edge distance controls cover at the sides of the slab. Both must be right. Keep mesh back from formwork, slab edges, and openings by the distance shown on the drawings. Reinforcement that touches a form or sits too close to an edge may not have enough cover once the forms are removed.
Use approved edge spacers where needed instead of pulling mesh toward the forms or propping it against timber. This is especially relevant around exposed slab edges, exterior concrete, and areas subject to weather or ground moisture. Required cover may be greater in harsher exposure conditions.
Plan around plumbing, electrical conduits, drainage lines, and pod systems before finalizing the mesh. Do not force mesh down over a service line or cut it without checking the detailing. If services conflict with the reinforcement position, resolve it with the responsible designer before the pour. A fast fix that compromises steel placement can become an expensive repair.
Check the Mesh Again Before Concrete Placement
The last check should happen after all trades that may disturb the reinforcement have finished and immediately before concrete is placed. Walk the slab methodically with the drawings in hand. Confirm the mesh grade and sheet orientation, required laps, added bars, chair height, chair spacing, edge cover, and clearance around penetrations.
Look for chairs that have tipped, mesh that has been flattened by foot traffic, loose ties, and areas where the vapor barrier has been punctured. Repair membrane damage using the approved method. Reposition chairs and mesh before the concrete truck is on site if possible.
During the pour, assign someone to watch reinforcement levels, particularly near discharge points and along work paths. Place concrete in a controlled sequence rather than dropping large loads onto one unsupported area. Internal vibration and screeding can also shift mesh if the support layout is light or the steel was not tied properly.
Do not rely on the old practice of hooking mesh upward with a rake after concrete placement. It may lift one section while leaving another too low, and it provides no reliable confirmation of final cover. Correct chair placement before the pour is the dependable method.
Common Positioning Errors That Cost Time
The most common problem is placing mesh directly on the ground or vapor barrier and expecting it to be lifted later. Other recurring issues are using chairs that are too short, spacing chairs too far apart, overlooking lap zones, and allowing mesh to touch formwork or services.
Another mistake is treating every slab as though it uses the same support pattern. A simple residential pour and a heavily loaded commercial slab may both use welded wire mesh, but their reinforcement details, access demands, and exposure requirements can be very different. Use the specified design, then adjust the chair layout where field conditions call for more support without changing the reinforcement design.
Quality Steel Supplies can provide mesh, bar chairs, and tie wire together so the reinforcement package is ready for the job. Ordering the correct chairs with the mesh helps prevent a common site delay: having the steel delivered but no suitable way to hold it at the required level.
A well-supported mesh layout is not complicated, but it cannot be left to the last minute. Set the right chairs on a stable base, support laps and traffic areas, maintain cover, and inspect the steel before concrete is placed. That gives the slab its best chance of performing as designed long after the finishing crew has left site.
Related Posts